Nato Watch Strap – 2
Construction Time
There are easier options and more difficult ones. If you are working with a 2.4mm x 22mm section of belt blank a lot of the work is already done. If you have to cut an old thick belt to size, and thin it, it’s going to be way more work. My ethos is the more you put in the more value a finished item has. Investment carries an inherent reward. This is not monetary – you cannot buy true fulfillment.
Let’s run through the latter option to cover all possibilities. Cut to size or thin first? Thinning the whole belt is a lot of work if you only want one blank to experiment with – so cutting is best.
Marking Out
If you work with wood or metal a marking gauge is good here. However, a steel rule and knife are fine. You’ll need to measure the distance between the lugs of the watch you’ll be putting the strap on. A most belts are already parallel so cut a piece around 19 inches long and mark a strip of the lug size along it’s length. Let’s use 22mm as an example. You may find it easier to scribe a line using the back of a table knife first to confirm you are happy with the cut line. It will show as a groove but not cut the surface, leather can forgive some errors. Then resite the rule and cut along in one continous movement if you can. If the leather is thick don’t try to go through on the first cut, it’s more important to get a single straight line that can be repeatedly followed until you are through.

In the image above the darker sample has a more distinct groove and is a much better piece of leather – smells lovely if you like leather, and not just for the weekend! The lighter piece has more of a coated surface which I would sand and refinish, but that’s later. Better leather will lose most marking lines over time. Behind is a marking template for blanks, made from part of a venetian blind slat. Her indoors was not happy! I thought more light might be a good thing?
We’ve got our blank so now we can start marking out. I would recommend a template for this. You can do without by measuring and marking on the leather, however if you are doing that why not do it on a piece of card and make the errors there, not on the workpiece. Plus, if you want to make more straps it speeds things up considerably.
To make a template you’ll need to know how long your strap needs to be.
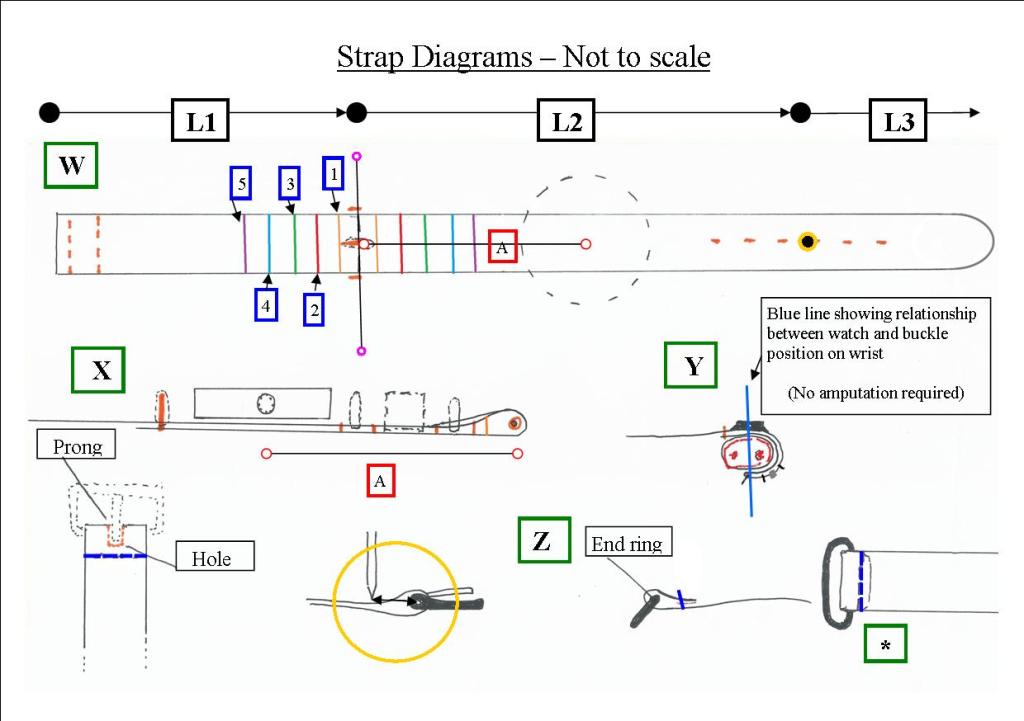
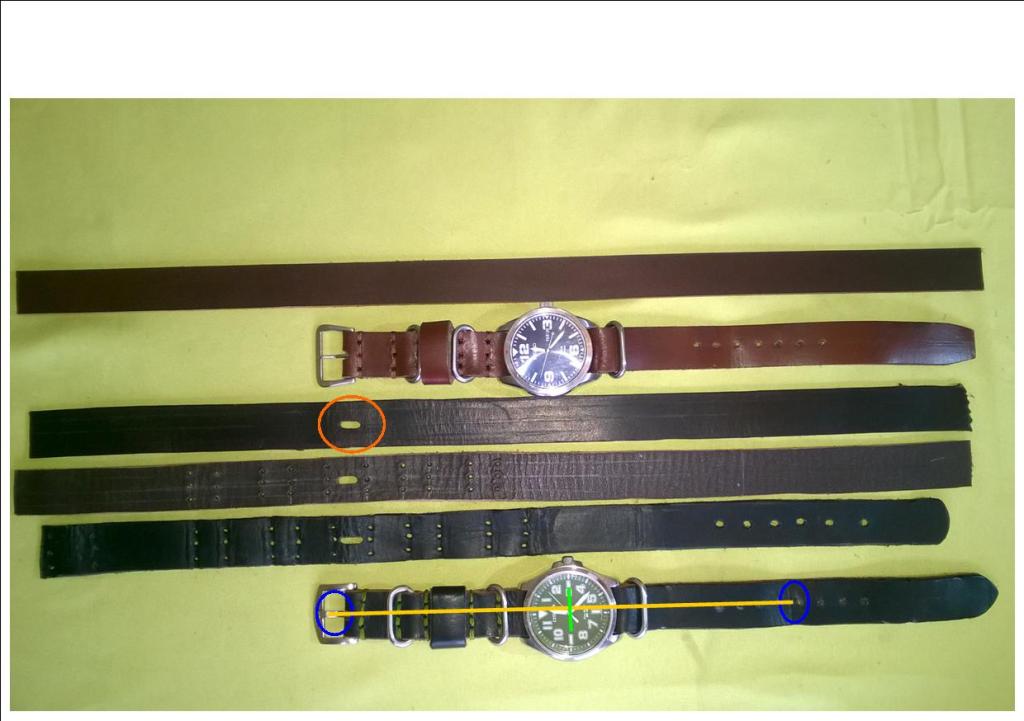
Above you can see all you need to work out your strap length. ‘A‘ is the primary factor, marked as a red square . This is half of your wrist measurement. Fig W shows A as being from buckle to centre of the watch. To complete the circumnavigation of your wrist we can double it to the centre hole as denoted by the yellow ring. This I’ve called ‘L2‘, as per the diag. To the left of the buckle line (denoted by pink ‘barbell’) is ‘L1‘. This is A plus 5cm which accomodates the end ring and gives a small margin to allow the strap to bend. The remainder is ‘L3‘ which is the flappy strap part. This is 90% of A.
My formula is :-
- L1 (A+5cm) plus;
- L2 (A x 2) plus; – (This is also shown on the last but one image as a yellow line)
- L3 (90% of A). This gives a proportionate length according to wrist size rather than a standard measurement, eg 10cm.
If I take my measurement of 21cm, as stated previously – A is going to be 10.5cm. Therefore L1 = 15.5. Add L2 at 21cm equals 36.5cm, and L3 as 9 .45cm gives 46cm, give or take fractions, or 18 1/2 inches-ish in old money. By all means add half an inch or a centimetre if your wrists swell or shrink with the weather etc – like mine do. It will only impact L3 length.
It sounds complex but once it’s done, and noted, that’s it – don’t forget this is a bespoke item! Now cut a 3 inch/75mm section off the top of the kids cereal packet and flatten it out. Not the cereal packet – the kids will only whinge – just the bit you’ve cut off. Other pieces of cardboard will also do the job. Mark out a length according to the above data and cut to size.
Hello? Where are we off to now?
Brief interlude as now having identified the length needed we can revisit the blank and trim accordingly. Some thinning should be done now if your blank is 3mm+ thick. Two main criteria here govern thickness. Firstly, getting the strap to fit between the watch case and the pins is vital.
Below bottom left shows what I’m talking about. The Invicta watch on the left has a completely round case and the bars/pins are bent to create strap space. On the right the Eco Drive has flattened areas (green circle) to enable a thicker strap to pass through and sit flatter. Note less bend applied to the pins. This unsuprisingly is common on military/field watches. Curved bars/pins are available online, or do it yourself – see pg4. Secondly, the strap needs to be thick enough to look the part: be strong enough to rely on and not to fail after a few months. Some of the commercial leather items are only just over 1 millimeter thick – almost like failure is being built in. God forbid! Between 2.0 – 2.7 millimeters will be fine, but not less. The straps will eventually break, normally just above the first prong hole. The measurements I’m giving are the best compromise. I’ve made thicker straps – bars like bananas are needed and they do pop out too easily – however the straps also look too bulky, are uncomfortable and don’t sit right. Avoid.
Anatomy (bits) of a buckle
- Frame – the large bit you can see most of..
- Bar – the bit (spring bar/pin) going across the frame that the prong swivels on and strap fixes onto.
- Prong – the bit that goes into the hole (was there a Dr Prong in one of the ‘Carry Ons’?).
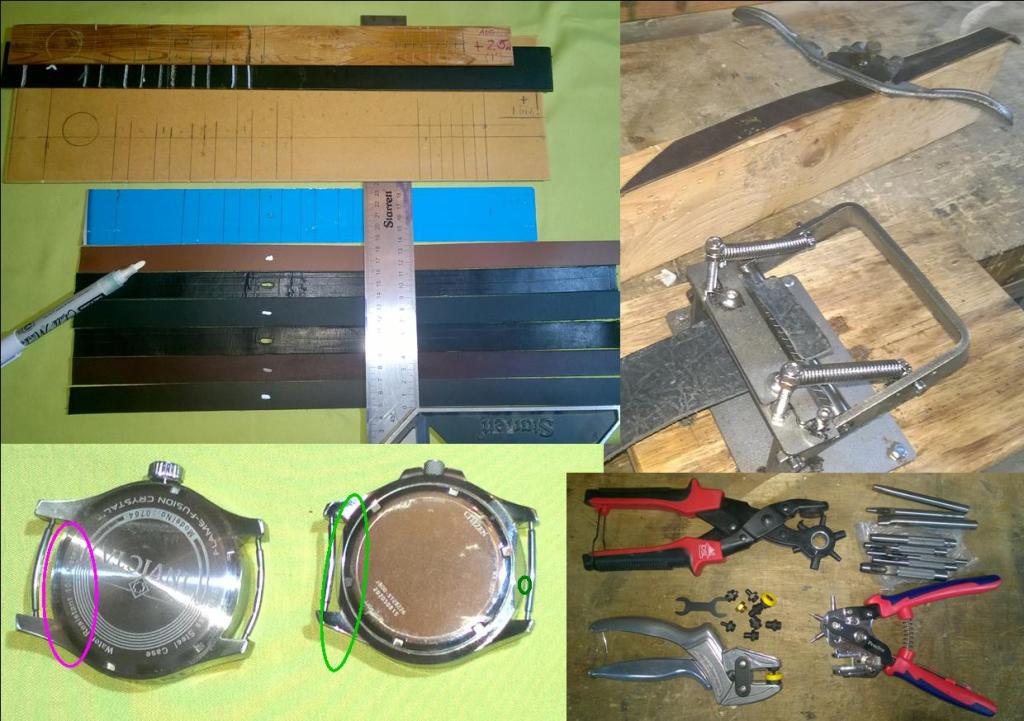
How are we going to thin the leather? I know I promised easy but this is more work if you haven’t got something of the thickness 2- 2.7 mm. If you have a spokeshave – no problem. Top of top right above shows length of 2 x 4 with the end of the blank tacked around the corner into the end grain. Works well. Using a knife freehand is okay if you don’t need your fingers (or any quantity of blood) in the future – so getting hold of the right thickness is vital if you can’t splash out a few quid on a spokeshave. The ‘Skivver’ below takes a craft knife blade and is adjustable – No surprise it’s 30-40 pounds(£). Works great.
Return toTemplate
Next, the afternoon western. US Marshal/Ranger/Sheriff Randolf Scott hunts the outlaws who killed his family (1956)………………….. And I’m back in the room! Sorry – wandered off there, but it does sound like it should be, Return to… oh forget it! Top left above shows templates and how I would mark a number of blanks simultaneously, but normally only 3-4. I mark and cut the buckle prong hole in all the blanks to visually/continually check all are aligned. You’ll note on the diagram W image above I’ve shown two sets of mirrored coloured lines radiating out from the buckle/prong line. These need to be accurately measured, and marked, to ensure they are exactly opposite when the strap is folded along the buckle line. Distances are variable depending on whether you want the rings closer apart or further away, or a loop is wanted or not. My default is buckle – ring – loop – ring (plus the end ring). You can modify as required. The template should look like the diagram at W. The example in the last photo – hardboard directly above blue card one – is full length with holes marked at right. These prong holes I make 1cm apart.
The white paint marker is a great item. One of those things you never knew you needed but now wonder what you did before it came along. Like reality TV, No, that’s definitely not right!
Using the marker of your choice mark the lines onto your blank. The setup should resemble the image above with the paint marker, using a straight edge to transfer the markings. I’m using a large steel square but a standard ruler will be fine.
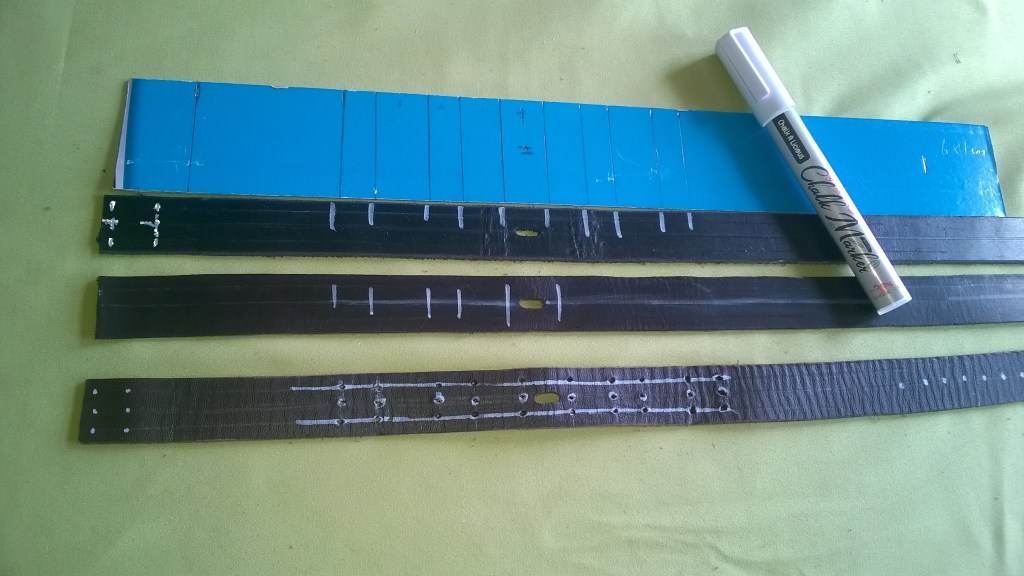
My effort above looks a bit rough but on dark straps I mark the areas with the paint marker and then more accurately with a pencil over the white background in order to see better, not mandatory, just easier. The middle strap has a central white line for the same reason, you wouldn’t be able to see the markings here either! Where the two intersect make a hole – it doesn’t have to be all the way though. You can do that once it’s marked up satisfactorily. The bottom strap shows where I’ve done this leaving the white for demo purposes. Now mark. halfway between the centre holes and the edge. two sets of marks for the remaining stitch holes, as per the image above.
The buckle hole – oval hole above – can be carefully cut with a craft knife. A round hole for the prong can be formed but this makes the prong stiff, and getting it on is difficult (Oh dear, this is really sinking very low! Benny Hill would disaprove.). A longer hole is needed to allow for movement.
Onto Page 3 – Putting it all together.
