Nato Watch Strap – 3
You may join two pieces together to make a long enough blank. You can’t join on the face side but you can where it can’t be seen – on the underneath. See first image below. So, for example, on the centre image you could have a piece that included the end ring, and ran back towards the buckle joining under the first ring. Potential joins are shown in orange. It would be around 4 inches long. The inference being it needs to be hidden, and obviously of identical leather. Butt pieces together and sew with matching coloured standard thread – Nylon is best. The idea is replicated on the top view by the green line with ‘join points’ shown.
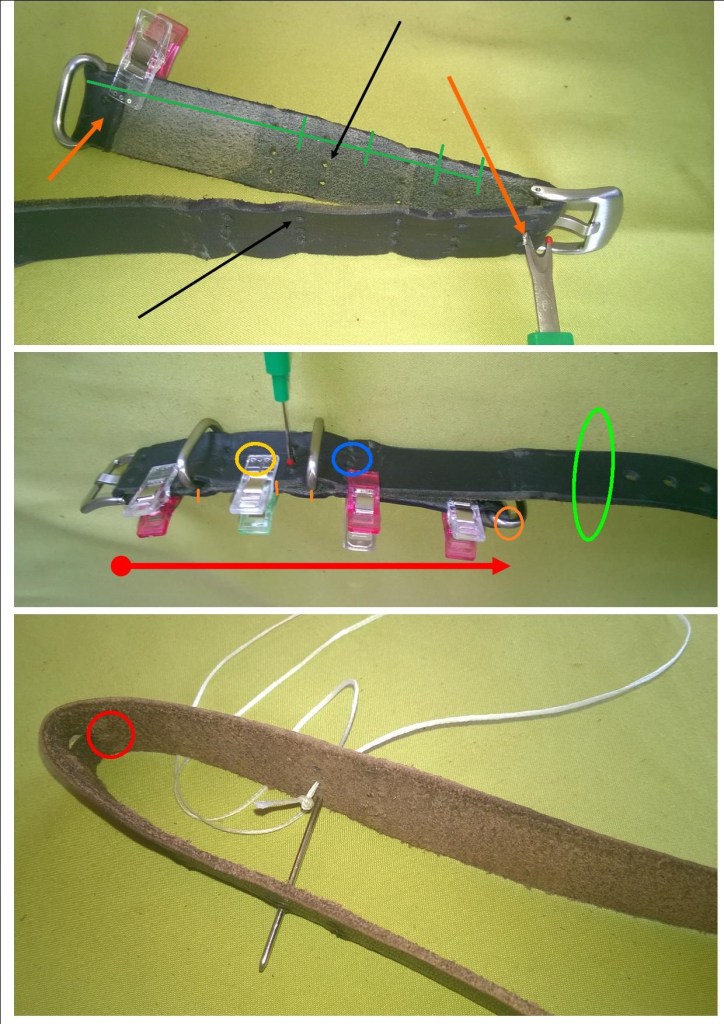
At top of above image I’m showing a used strap with stitching removed to give an idea of what you should be looking at. A stitch cutter is pinning the strap together at the central hole of the buckle stitch line – the starting point. The plastic clip holding the end ring in place is the finish line. The awl/stitch holes are clearly arrowed. Don’t be tempted to punch out the stitch holes. It looks rubbish and the strap is weakened. A mistake will also trash the blank – an awl hole in the wrong place can be overlooked.
In the centre image the strap is shown mocked up as if already sewn. The rings are present but not the loop (yellow ring). The blue ring shows the last line before tying off and doing the end ring – Oooh! The red line indicates working direction. For those who remember the comment about the strap’s weak point – that’s the area in green. Crikey – that was a while ago!
The bottom picture is showing the knot being hidden. The red ring shows the proper start ‘knot’ point as mentioned elsewhere.
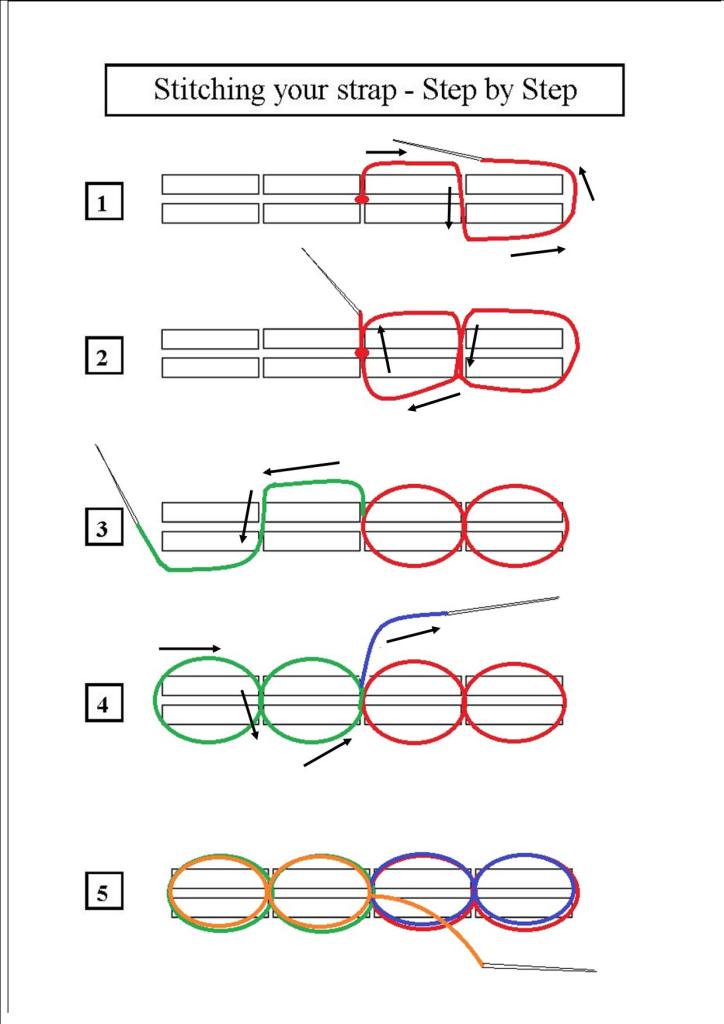
Let’s look at a step by step stitching outline. Of course you can do whatever you wish, but this method looks good and works well for getting the thread positioned for each step – This is a cross sectional image – the blocks represent the strap itself, the three vertical gaps are your thread holes;
- Step 1 – You will need to form a figure of 8 on each pass. One full pass is identified by a different colour. The knot is hidden between the two layers of strap. You go down the first hole, to the right or left, around the adjacent edge and…..
- Step 2 – ..back down the hole you came out of. You should now be underneath the strap. Go up through the centre hole. And you should be back where you started -red 8 complete, simple as that! Ensure your stitches are tight. Not too tight – you’ll distort the leather and ‘sink’ the stitches too deep, losing the aesthetics and stressing the join.
- Step 3 – Now just mirror steps 1 & 2 on the opposite side – green.
- Step 4 – Again your (green) figure of eight should bring you back to the start point. This next pass (coloured Blue) is a repeat of the first red pass.
- Step 5 – The last pass -a repeat of the green step – is shown in Orange. This stitch line is complete. The final step shows the thread coming out between the two layers (see [orange1] image below). It then travels – unseen between the two layers to the next stitch line, and you start again.
Note:- Only go from hole to hole in one bound. Do not miss a hole. On the face side it will look crap, on the side you cannot see it will disadvantage the strength of your strap. You will probably have to use your awl or your substitute ‘awl’ to open out the holes easing the process. If your holes don’t line up well you’ll find out now! A little bit out is not a problem so crack on. But a couple of millimeters isn’t good. How many rows of stitching per line is your choice. ‘One’, (just the red and green steps above), I don’t deem enough for strength or colour contrast. ‘Three’ is too much for the holes to take and will start to refuse to lay flat, looking untidy and bulky. Two rows (as above) is the ‘Goldilocks’ solution..
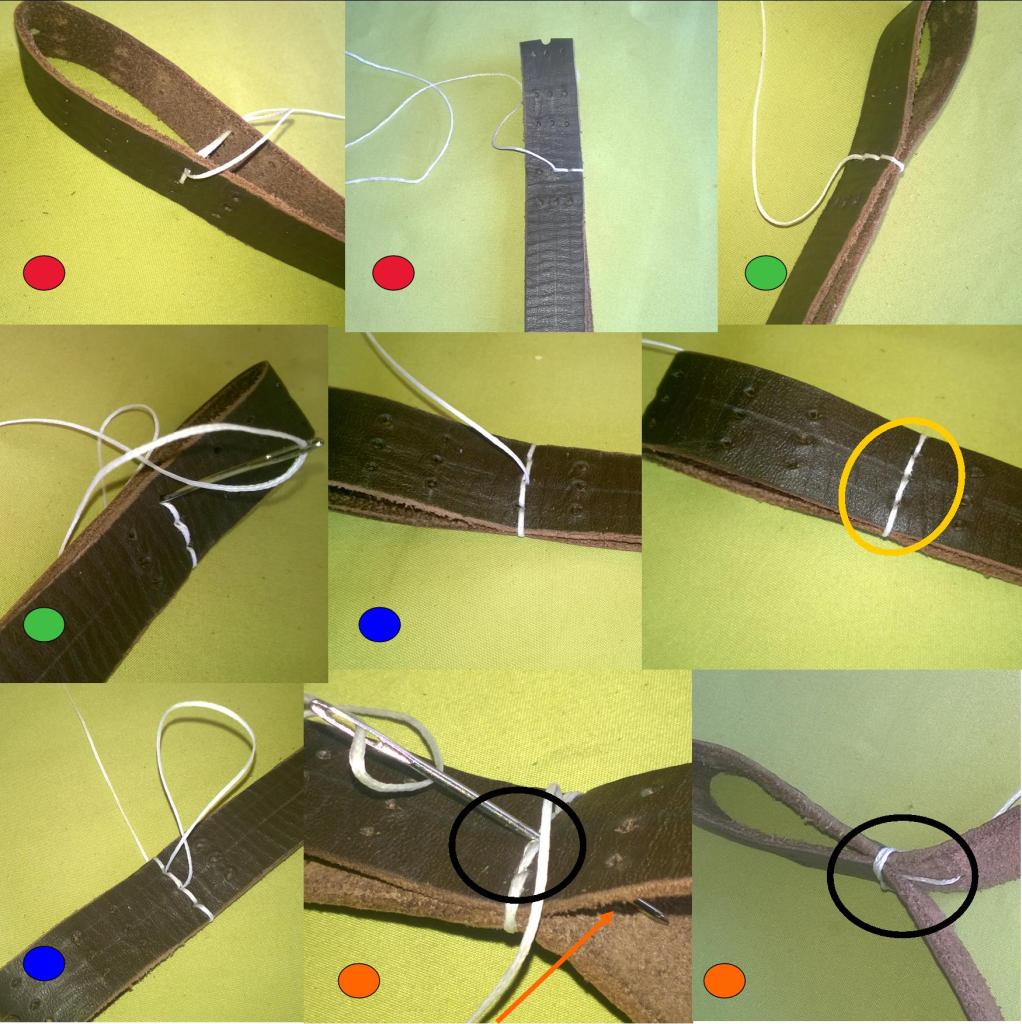
The image above shows the step by step in reality. I do not start here. This area I’m stitching here is nearly at the end. I chose this place for reasons of clarity/demo. I’d start at the buckle normally but the metalwork obscures the view of the stitching.
The ‘red dot’ pictures relate to the first pass. You can’t see the knot as it’s hidden. That’s the idea! The ‘green’ pics show that stage in progess. Just starting the ‘blue’ stitching whilst at far left is shown the underside at the same point – All neat and tidy, how it should be. Lastly comes the finishing of that stitch line. Don’t go all the way through as if you were going to start another run. Pull the strap lightly apart – orange arrow – and push the needle through the bottom strip only as shown (the strap is upside down here) and pull the thread though. Slide on your loop or ring and go up through the top layer and start on the next stitch line to lock the ring in place. -see bottom right black circle. You can tie off each time but I’ve found it isn’t necessary.
You will need to tie off- as stated above – in order to move to the end ring. See pg 2, strap diagram, item ‘Z‘. -Which will also need tying off, of course.
For your buckle prong holes refer back to pg 2, strap diagram for the ‘L2’ measurement. After marking this centre hole mark another three each side a centimeter apart. Why do anymore? – I hear you ask – It’s ‘custom’, just to fit me? Well, because wrists swell/shrink, and there are times when you may need to wear the watch over clothing, which I’ve done many times outdoors. It’s more comfortable to read the time that way than break the protection afforded to your skin by pulling back multiple layers of clothing. The strap will also stretch and settle over time. I dot/mark the holes with paint marker and check if they’re straight ‘to the eye’. Thumbs up? Then punch out. Either use a single punch or a rotating one as seen in the 5th image up, and on pg4.
You may wish to put something on the strap, apart from the watch of course, and I tend to oil mine. An oil will keep the strap from picking up oils, dirt and cells from your skin that tend to whiff a little, like many leather straps do. It will also nourish the leather, and keep some moisture out, lengthening the strap’s life. Oiled leather has a good look too, in my book.
I don’t use organic oil much; Almond, Olive, Grapeseed etc but you can, it just may become a little rancid. Good old petroleum jelly is my choice – for straps, (don’t start with the weird stuff!), it has little odour, is cheap and works well.
If the edges of the strap need tidying flashing a lighter flame along it will do the trick. Too much you’ll damage the strap so go easy. Burnishing is simple, cheap option and you can see how this is done elsewhere online.
As mentioned previously leather is a little forgiving. The thread holes you make may seem large, but it will all settle down over time, the leather will flatten and the holes close up a bit, which all helps lock everything into place. Don’t sweat it.
That’s it.
I can see that for an easy project this is an in-depth article. There’s a balance between informing you to my best ability and not swamping the thing. I need to give the information to ensure the best result is achieved, but without making it look too difficult. Bottom line is if I leave something out which causes doubt, preventing positive progress, you will fail, and by inference so will I.
If you think they look good and you fancy a challenge, that you can wear everyday – Full steam ahead!

Page 4 has some further info to help refine the product and answer some of the questions that have cropped up.
