The usual safety provisions apply. I won’t insult the capable but for those who are a little vague on what’s under discussion please read the safety stuff on the Information page.
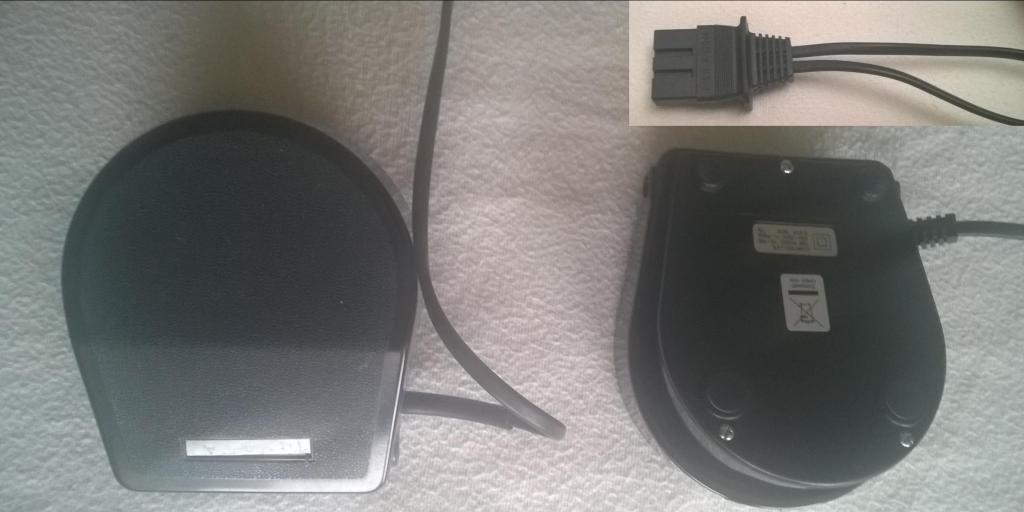
I will state at the outset that sewing machine pedals have varying standards. The one used here ‘YDK’ is utilised on many top end machines and has been for decades. It is extremely robust – of heavy construction with thick hard plastic – and will take many years of effectively being kicked around the floor and stamped on. I paid £14 new but got lucky, most are closer to twenty. If you can get a secondhand YDK pedal and cable/plug assembly just use the pedal with your machines cable/plug. – See below. Suffice to say a manufacturer may charge considerably more for the same thing.
Installing an after market sewing machine pedal
When writing a review of the replacement pedal, and responding to the resulting questions that were posed, it became clear that a majority of users were unsure whether the replacement pedal would fit their machines. In spite of the manufacturers assurance of universality the lack of confidence was unmistakeable. I expect there will be exceptions, there always is, but a high proportion of machines have the same method of functioning, as described below, where the pedal is concerned.
Hopefully, this will be easy to understand and follow that if you look inside your old pedal and see two wires feeding two terminals then you’ll be confident that you know how this bit functions. It’s a case of you are just changing one switch for another. It might not be the same make, or colour, or size, but it’s doing the same job.
What will I need?
- Philips screwdriver PH2 – This may be all you need if you know the pedal is toast, and the swap will be straight forward.
- Multimeter – If you want to confirm the fault and understand the process.
- Soldering Iron – If the pedal terminals are so fixed. Not common but………..
- Crimping tool – If new terminals connectors need fitting.
Identifying the problem
Some time back I bought a sewing machine from ebay. It was a Brother machine with only a couple of years under its belt. It wasn’t working and cost me around £20 delivered. The problem was pretty easy to work out. The light worked, indicating power was reaching the machine via the plug. Either the motor or the pedal was broken.
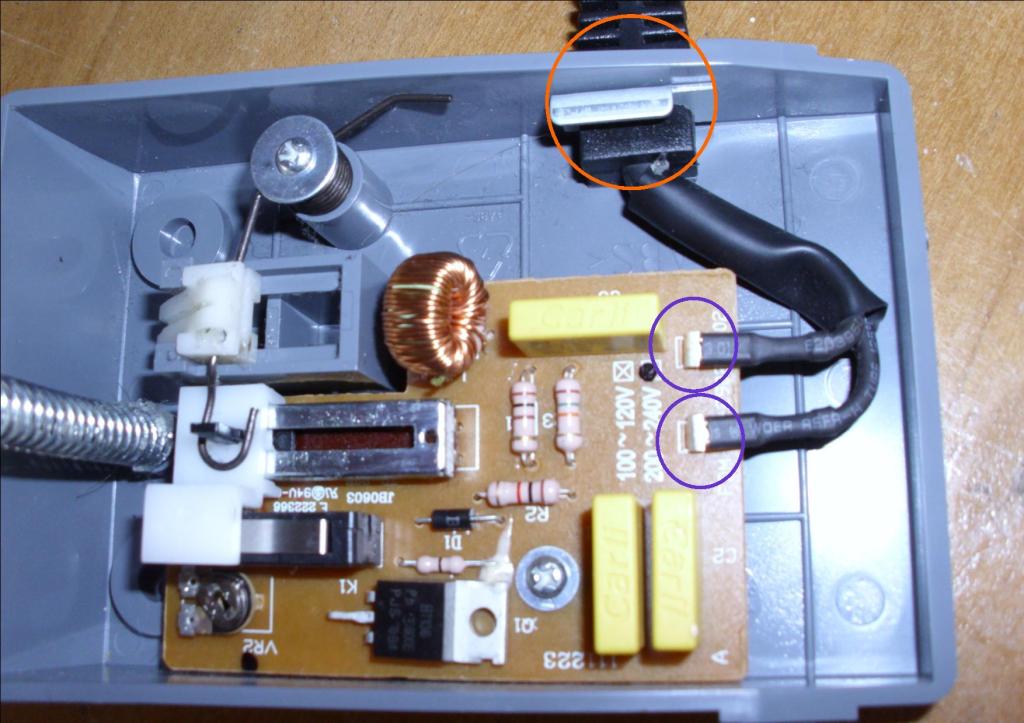
Internal machine wiring and motor damage were ruled out simultaneously when I checked the machine by connecting, with crocodile clips, a test cable across the switch cable connectors – purple ring below – it beeped. With this cable connecting the ‘purple’ lead ends together (and the switch disconnected), it powered up and came to life, the motor functions, i.e needle goes up and down. That left the pedal itself as the cause.
On opening the pedal – brands vary but a couple of screws is normal – nothing jumped out as abnormal i.e toasted, melted or any other form of cheesiness. It should not be plugged into the mains or the machine. The cable connectors – circled purple on image below- are firmly in place and there’s no obvious burnt out components, although evidence sometimes hides on the other side of the board. You can often smell it but whipping out the PCB screws and taking a gander will sometimes confirm – but there was nothing. I reasoned it was an unknown fault on the board. If it was very obvious I would replace the component and test the switch. The component may have been faulty, or it may have been caused by yet further component failure – a chain of failures. However, without anything visible it’s like blindly pinning the tail on the donkey. Short of removing and individually testing all the parts, or sourcing a very expensive pcb tester, a pedal change is the best option for a layman like me.
How’s it work?
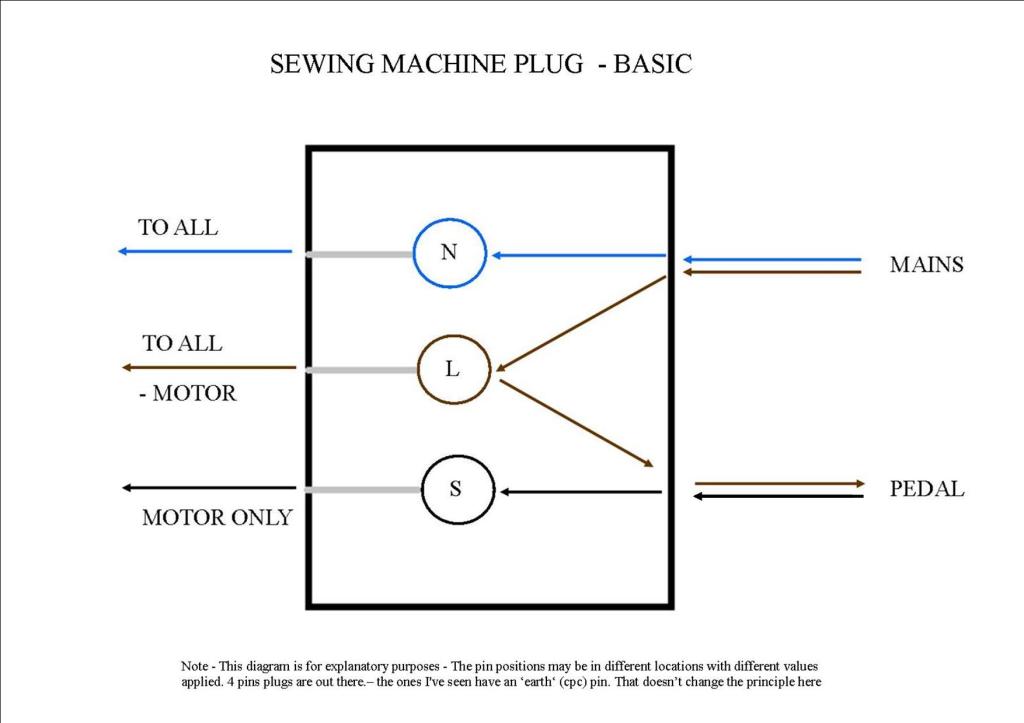
To summarise the diagram below. At top right is the power coming from the plug. It splits, and the blue neutral goes off to all the places it needs to. That’s it for that feed. The brown live goes to a central pin where it goes on to feed everything, except the motor. A spur goes off to the pedal, and the black wire indicates its path of return. It then goes to the motor – pedal goes down and circuit completes. Machine runs. Current switching across a single cable is known as single pole.
In effect you are switching the motor independently from the rest of the machine – by the pedal. It’s very simple. However, there’s a conception that it is difficult and people are hesitant to engage. I’m trying to address that myth.
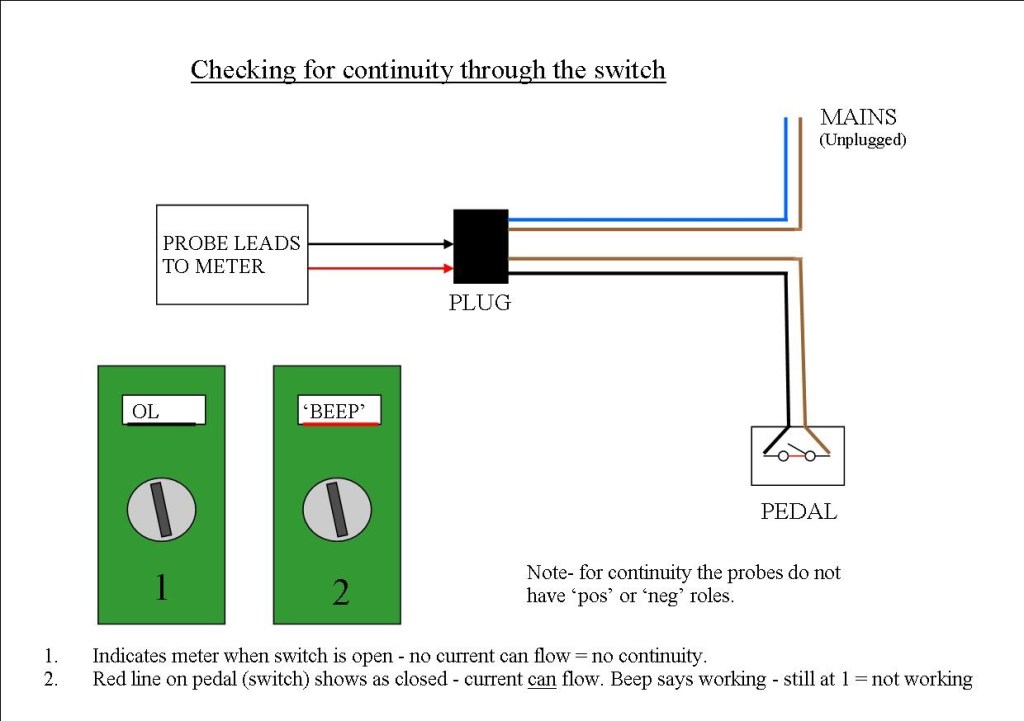
You can test without connecting to the mains easily enough with a multimeter (£10 or less) This is for a 3 hole plug;
- Set meter to continuity (looks like an audio symbol). Insert probe into one of the three holes (L,N,S) in the machine plug (at left on diag ‘to all’ etc.). Touch the other probe to one of the shorter pins – L or N identifies the pin – on your mains plug.
- If it doesn’t beep/buzz/light up move to the other pin on the mains plug. If nothing is heard you’ve identified the switch lead (‘S’ above), or it’s the live and you haven’t checked the fuse. Perhaps it’s not your pedal in that case!
- Check all three holes in the machine plug to identify the neutral, live and switch pins/socket.
- Now put the probes into the machine plugs L and S connections. You have now closed one end of the circuit. If you push your suspect pedal closed this will complete a circuit with the meter as a load. A lack of indication from your meter tells you the pedal switch is kaput – see below – and has failed to close the circuit
At this point you may be asking ‘why are you telling me this? – I just want to change the pedal! That’s fine – if you feel confident, crack on! However, knowledge of how something works, particularly with electrics, means that ‘understanding’ brings with it enlightenment and confidence. Knowledge is power. Additionally, many people like to know ‘stuff’, and should be congratulated. If they are doing the job for another person that knowledge can only give them credibility, and the other person security.
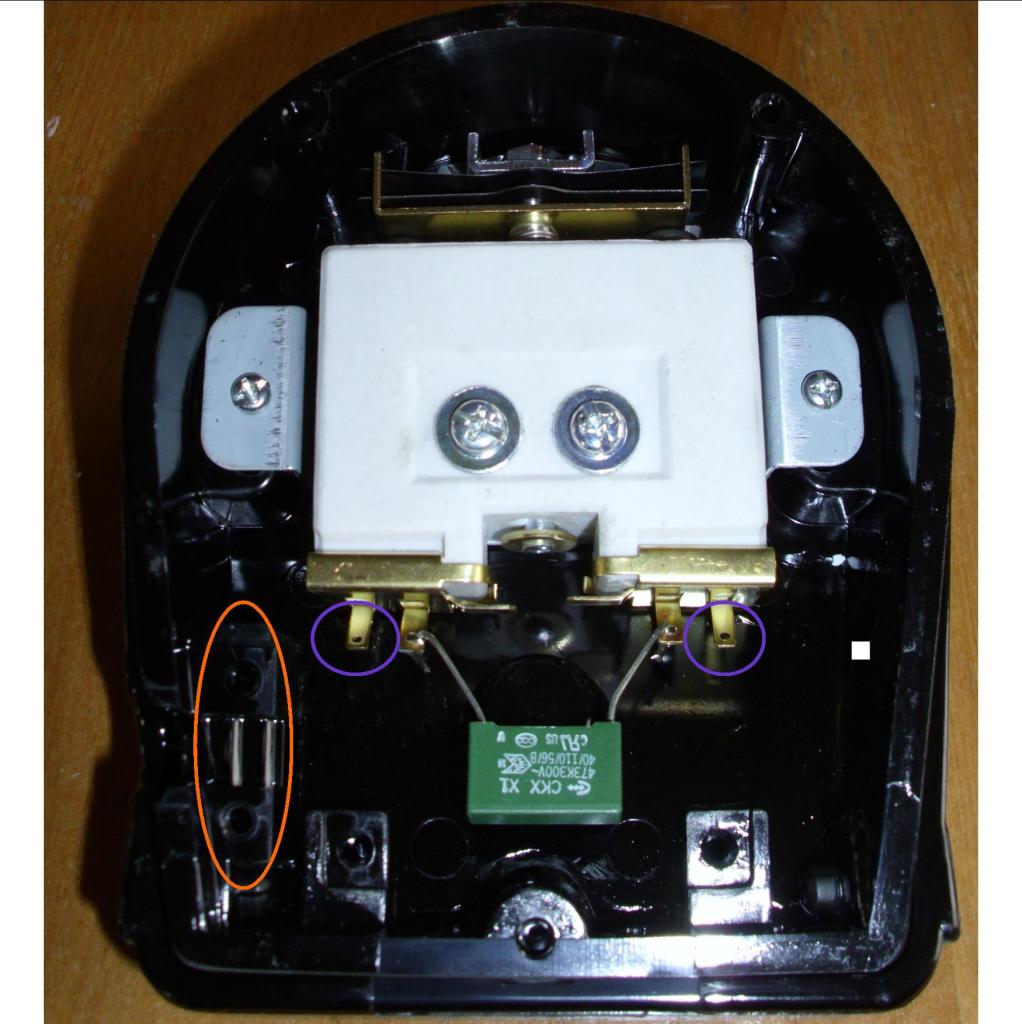
This pedal’s cover just unscrews underneath. The two terminals that need to receive your old pedal’s connectors are ringed purple. The orange ring just highlights the cable clamp. This must be utilised and the switch cable firmly clamped. The connectors are for current, not for holding the pedal to the cable. The two connectors coming adrift is not a good place to go. No really it happens!
Does it matter which cable goes on which terminal? No. It would be the equivalent of saying,.. ‘should I join the left hand cable to the right, or the right hand cable to the left?’ If connectors fitted from the defunct pedal are present, and one end is shorter than the other – then the reach of the cable dictates positioning, obviously. You are just replicating the original.
What if the connectors don’t fit, or the old wires were soldered in place? New terminals -spade connectors- will need to be fitted. Literally a five minute job. A pack with a basic crimping/cutting tool and assorted connectors can be had on Amazon for £5-£8. If you feel good about your pedal repair this won’t be the last time you’ll use items like these. As for soldering that depends on if you have a soldering iron (Less than a tenner on Jeff ‘B’s website). Again, if you want to fix your stuff then the investment will pay dividends.
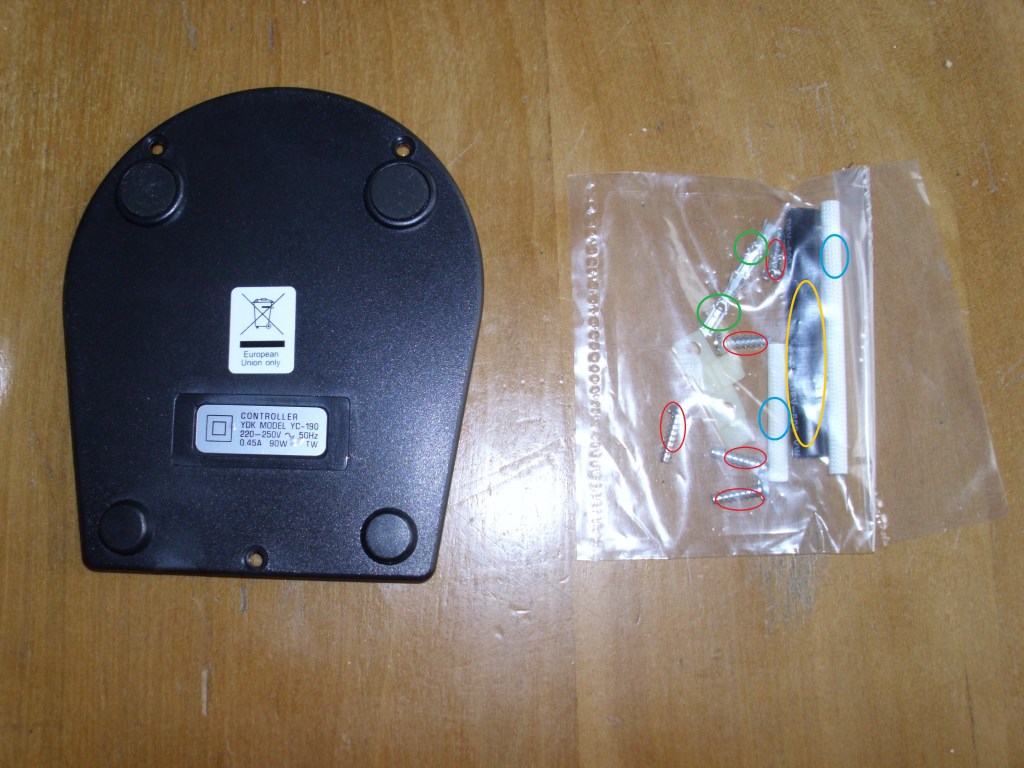
This is the bottom access cover and fixing kit that came with the YDK pedal. It already contains two spade connectors (green ring) along with material to cover any bare terminals or wiring (blue ring), and the cable clamp (ringed in yellow) plus screws (red x 5 – 2 clamp, 3 bottom case – at left). With this particular item nothing else is needed, although it may not be the case with all pedals.
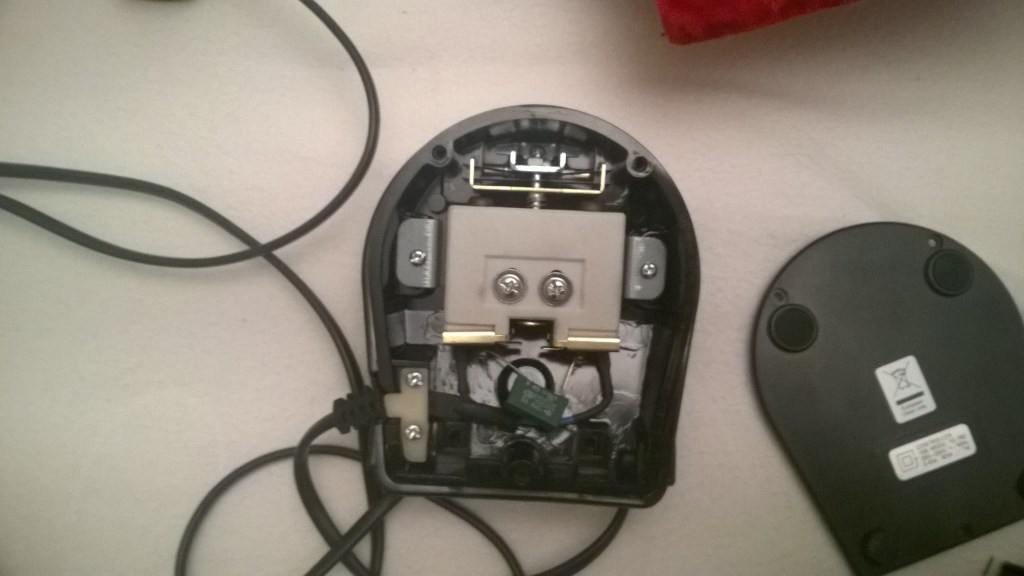
I’ve included the image below of a pedal from a Toshiba machine as it confirms the commonality of this type of pedal, and it’s use with a quality machine.
A pretty simple job, but my reasons as stated at the beginning seem to indicate otherwise. I hope the mists have cleared a little now, and your machine is working, or you intend to make that happen.
And save a few bucks too!
Images and Article Copyright © 2025 by L.C McCarthy
