Sewing projects – General Information
Firstly, if you are reading this and think this stuff isn’t for men, you’ll need to go and take a long hard look at the way your brain works – or doesn’t, and remember to ask yourself why so many genuine men don’t have to pretend to be ‘blokey’ all the time: they just get on with their lives following their own flag..
Saville Row is bursting with tailors – a very reputable profession, and womenswear would be a poorer place without the likes of Dior, Lagerfeldt and Yves Saint Laurent.
My intent is to add here whatever seems useful, as I work back through past ‘jobs’. Most of my stuff is of a practical nature, often to solve a problem. Not that it can’t look good – as well as functional.
Feet – Walking or otherwise!
Foot – Basic interface between machine and workpiece. It may be simple – like the zigzag foot – see image below (4) circled orange on right – and be in use 80% of the time, or a task specific foot for zips or buttonholes (the last one is a great thing) and many more (including a ‘walking’ foot!). See image centre for my foot fetish – Errr..Oh… that’s not right is it?
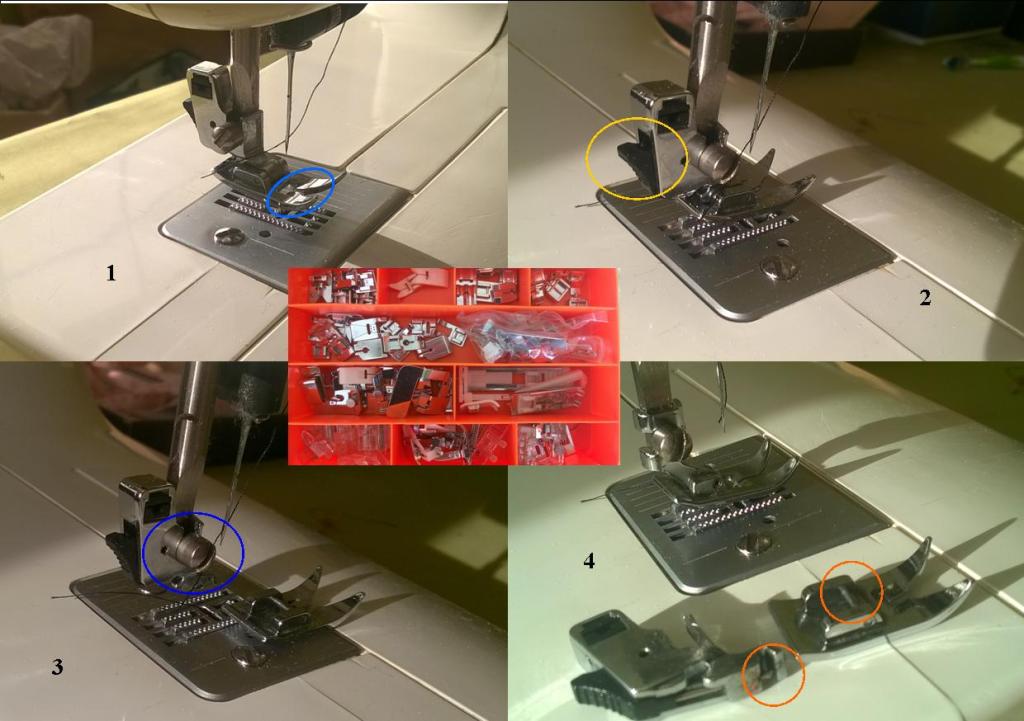
You’ve taken possession of a sewing machine. There’s a good chance it may have a basic screw secured foot. It may come with a couple of different types. Priority job will be replace it with a quick change (QC) foot. The ability to quickly and easily change the foot during work is a real boon. I often drop the foot when rethreading. Additionally, assorted packs of snap on feet are cheap online. If you find yourself using a particular type better quality items can be procured later. The actual quick change foot is seen in use at fig 1. The release button is circled yellow in 2, and sited to be reachable in use, but not able to be accidentally activated. A squeeze will drop the foot easily by gravity (3). The screw ringed in blue is the single securing point for both the QC and any fixed foot, as seen at fig 4. Changing this in use is a pain! Get your screwdriver out! Also shown is the QC assembly and foot attachment points, ringed in orange. These items run at about £8/9. Sets of feet run from 10-20 $/£s. They follow my standard tool rule.
10% of your tools get used 90% of the time, 90% of your tools will be used 10% of the time
The last part does not imply that the 90% won’t save your butt when needed.
There seems to be a pattern here…..
Patterns can be fairly cheap and usually cover a wide variety of sizes – same reference number, different size range so watch out for that one. There is a habit of users cutting patterns (to get the one size you want) thereby rendering the rest of the pattern, with all the other sizes, useless. This is pointless for two reasons.
Firstly, with just a little effort you can transfer your required size to blank paper leaving the pattern intact. The other sizes may be useful if you need larger or smaller versions later on. Saves the cost of a new pattern.
Secondly, transferring to paper produces a more robust version (standard patterns are made of tissue paper, and I suspect not designed for repeat use) that will stand multiple uses. Different versions can be produced – all say xl – but with different body lengths, cuff diameters, sleeve length, pockets, hoods etc…
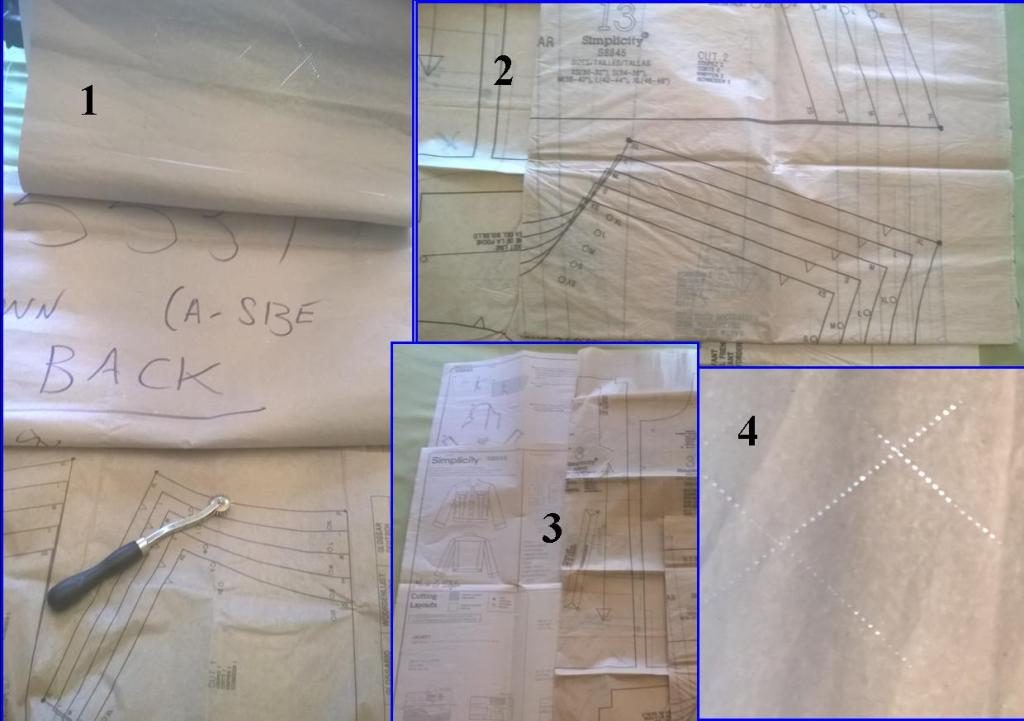
At 1. above the pattern is at the bottom, centre is the back of a dressing gown pattern. I make all mine, patterns pieces that is, not gowns, from that recycled brown paper from parcels. That buckshee roll of 70’s palm tree wallpaper finally finds a use. Cheap and all that good planet stuff. Yes, it takes more time, especially as I iron it before use. However I, (as do many others) also iron the pattern before marking out. Tissue paper creases a lot, and often arrives from new looking like beige lettuce. An overlooked crease is going to end up on your finished item! Just lay the whole uncut tissue sheet onto your blank paper and select your size and transfer the outline to the paper below. At bottom is the tool (actually for leather*) I use to follow the source pattern which leaves a row of holes seen at top of image 1 . Enlarged at number 4 – demo lines. With light behind draw along dotted lines and cut out. I mark the piece up as shown (centre image 1.) with pattern number, size and name plus any mods. Yes, the original pattern will now have rows of holes on your chosen size but it’ll remain all together and very useable. I’ve attempted to show (2.) how the different sizes will look on a pattern, so you can see how cutting one straight out is going to make the rest of the pattern useless. If you don’t tear it, the remainder can be stuck onto paper and cut out from there, but why not go with my method from the start? 3. This pattern (Simplicity S8845) has very good sheets that come with it showing step by step instructions, some brands are better than others. This one also has a series of pretty good videos on You Tube.
*Leather Marking Tracing Wheel – The spiky brass hub type, not the one with a ‘saw blade’ wheel. The last one doesn’t have the penetration (stop it!) £5 or less.
I need a plan?
Definitely. There’s enough smartarse sayings about ‘planning’ out there so I’m not repeating them. However, they are crucial for the best result. I’ve noticed that people on cooking shows often don’t follow the recipe (‘plan’ – one already provided!) and looked absolutely stunned when their creation takes like garbage. When questioned by the judge it turns out that they; left out an ingredient, measured in the wrong format, didn’t mix in the right order, opened the oven door, didn’t set the timer, ran out of time or ‘misread’ (didn’t bother with) the recipe. Muppetry of the highest order, but they still look bewildered.
Every pattern comes with a plan. Most are really good and you don’t need lots of experience or a qualification to follow them easily. But what about the extras you seem obsessed with adding I hear you ask? Grab a sheet of paper and list down all the pieces you may wish to add numbering them as you go. Read through the pattern instructions and insert the numbers clearly (red marker pen?!) as you go. Follow your new plan. Easy. There will be grey areas with this. Obviously before you sew a sleeve together – when it’s still a flat piece – you will want to put on pockets, badges etc. It’s difficult and very time consuming to do it afterwards and may be impossible. Leaving the item off, or splitting the seam (my choice) are the options then. Annoying. You may be fine sewing a badge on a jacket front when you’ve sewn the garment into one piece, rather than when it’s just the ‘front left’ piece for example, but before it’s lined. However, this usually makes it harder to manhandle through the machine so it’s not best practice.
What stuff do I need?
If you look at various projects you may be a bit put off by the hods of stuff people seem to use to get a job done. The normal pattern of things is you just get what you need for your current job. Over time your resources build up. That’s where most of us will get to, but that’s pretty normal for anyone who acquires skills. However, apart from stuff you probably already have -scissors, pencils etc, requirements of a specific type are small. Obviously your fabric, zips, buttons, thread and so on will be needed but what else?
NOTIONS – This means all the zips, buttons, poppers, elastic, cord, pulls and so on. Buying sensible amounts of these is good. You might only need 4 buttons for your job but if they are a quid apiece, or ten for a fiver, the choice is clear. Kicking the arse right out of it and buying 144 for £50 may seem like good economics but, unless you are looking to become the global button King, it’s a bit daft.
FABRIC – It’s assumed by many that this is going to be a very expensive part of a project. It does not have to be so. Many people recycle old clothes, bedding, curtains and suchlike with fantastic results and often specialise in this area. Normal mortals like me use sheets, duvet covers, blankets – both new and old – to make loads of things. New quilt covers bought from eBay, Amazon etc are often cheaper than buying fabric from the roll, especially if you know the brand or quality of the sheeting. I usually stick to cotton where possible because it can be dyed easily, unlike part or wholly synthetic which needs special dyes and often produce mixed results. Every squaddie knows old socks make great cuffs, as do old jumpers where the body is of no use. Knitted collars can also easily be made from sections of defunked knitwear. I make a lot of items from fabric used for outdoor furniture, bike and golf buggy covers etc. Recently I bought a buggy cover for £22 (inc. post) new online, and got 13.5 sq metres of waterproof fabric from it. That’s £1.63 a sq.m. Bargain.

